

Deleting a page in Microsoft Word can sometimes be tricky, especially when the page is blank, hidden behind formatting, or in the middle of a complex document. This guide explains why you may not be able to delete a page, and shows step-by-step methods to remove any page safely, including solutions for iOS Word and ClickHelp users.
Why Can’t I Delete a Page in Word?
You may notice that despite deleting content, a blank page remains in your document.
Common reasons include:
- Hidden paragraph marks (¶)
- Page breaks or section breaks
- Objects or tables that occupy space
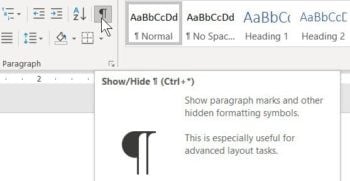
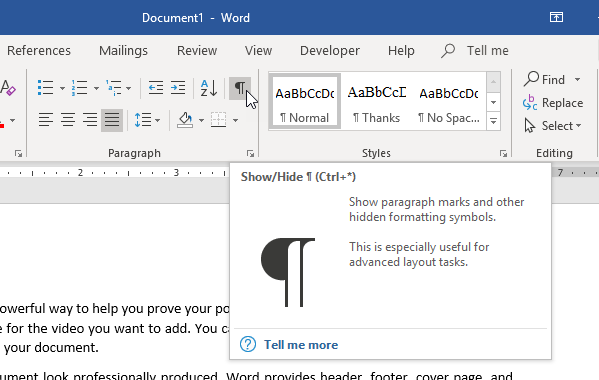
Tip: Turn on formatting marks: Home → Show/Hide ¶. This will display paragraph marks, page breaks, and section breaks so you can see what is preventing the page from being deleted.
Show/Hide ¶ button in Word
Deleting a Blank Page in Word
Blank pages often appear due to extra paragraph marks, page breaks, or section breaks. To delete a blank page in Word:
- Go to the blank page.
- Enable Show/Hide ¶.
- Place the cursor at the start of the page.
- Press Delete or Backspace to remove unwanted paragraph marks or page breaks.
- If the blank page is caused by a section break, select it (double dotted line labeled “Section Break”) and press Delete.
For instance:
If you encounter a page break marker like this one:
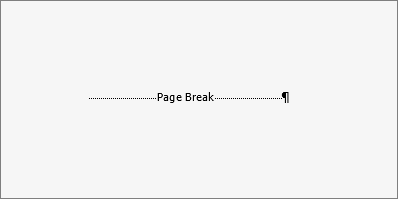
Select it and press Delete to get rid of the blank page.
How to Select and Delete any Page in Word
Sometimes you need to delete a page with content. There are two main methods:
Method 1: Click + Drag
- Place the cursor at the start of the page.
- Click and drag to select all content on the page.
- Press Delete.
Method 2: Ctrl+G → \page (Precise Method)
- Press Ctrl + G (Windows) or Option + Command + G (Mac).
- Type \page and press Enter.
- Click Close.
- Press Delete.
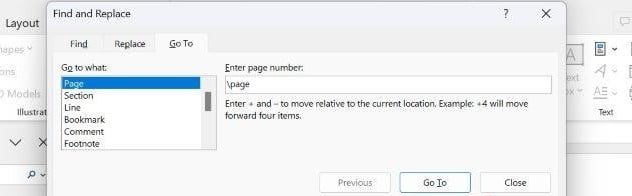
This ensures all content on the page, including hidden formatting marks, is selected.
How to Delete a Middle Page of a Word Document
Deleting a middle page of a document needs cautious selection when your document has intricate formatting or section breaks:
- Enable Show/Hide ¶ so that formatting is visible.
- Select the page content you would like to remove using Shift + Click or click-and-drag.
- Delete page breaks or section breaks carefully.
- Press Delete to remove the page.
Avoid deleting section breaks unintentionally. They control headers, footers, and page numbering.
How to Remove a Page in Word Without Affecting Other Pages
When deleting a page, it’s important not to disturb the rest of your document’s formatting and layout. To safely delete a page without disturbing formatting:
- Only delete the content and breaks specific to that page.
- Avoid removing necessary section breaks.
- Use Undo (Ctrl+Z) if a mistake occurs.
- Copy important content elsewhere if needed.
For example, imagine your Word document is divided into sections, each with its own header or footer style – perhaps the first section has a title page with no footer, and the following sections have numbered footers.
Here is an example of a section break that’s controlling footers:
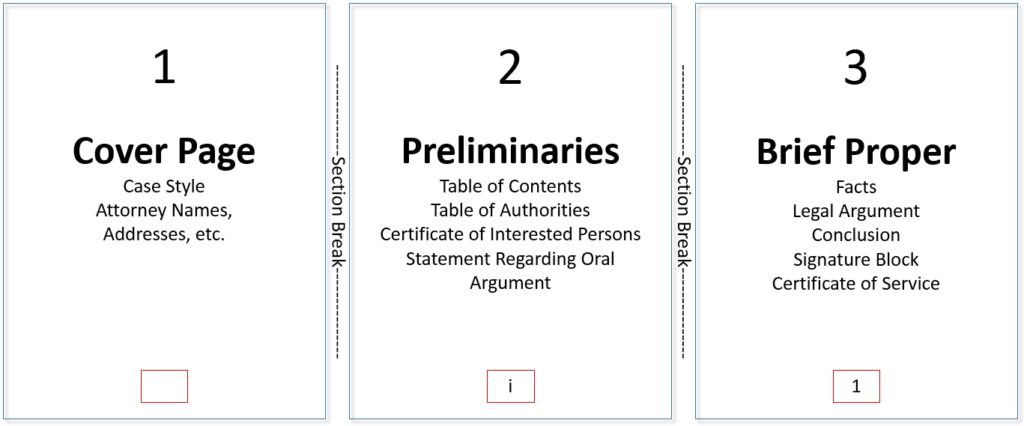
The way pages are numbered—or not numbered—is controlled by section breaks. If you delete a section break that separates these parts without understanding its purpose, the formatting from one section may spill over into another. This can cause headers or footers to change unexpectedly, such as page numbers restarting or different header styles disappearing.
To avoid this, carefully inspect each section break using the Show/Hide (¶) feature. Delete only those breaks that are truly unnecessary, and double-check the headers and footers after deletion to ensure the document’s formatting remains intact across pages. This careful approach helps prevent unintended changes to your document’s overall design and keeps your formatting consistent throughout.
The Importance of Formatting Marks and Hard Page Breaks
It’s difficult to successfully edit a Word document without turning on formatting marks. You simply can’t know what you’re deleting if they’re not visible. Removing a blank page, for instance, is often as simple as deleting the hard page break that causes it.
Always activate formatting marks — they alert you to potential issues before you press the Delete key. If your document has different headers or footers across sections, or a unique first-page header, keeping formatting marks visible helps you slow down and consider how your deletions might affect the document’s structure.
This careful habit prepares your document for success by preventing unnecessary changes to formatting or headers. It ensures you remove only what’s necessary without disrupting the overall layout and design, allowing you to delete unwanted pages effectively.
How to Delete a Blank Page on Microsoft Word (iOS)
If you’ve created a one-page CV on your iPhone using Microsoft Word but notice an extra blank page has been added, a quick press of Backspace on the blank page might not fix the issue. This usually happens because Word for iOS treats hidden formatting marks—such as paragraph breaks or special characters—as content on that second page, which cannot be removed with Backspace alone.
How to fix this on your iPhone:
- Open your file in the Microsoft Word app.
- Tap the ribbon at the top and locate the icon that looks like a paragraph mark, known as a Pilcrow (¶). This button toggles the display of special formatting characters.
- Tap the Pilcrow (¶) symbol to reveal hidden formatting marks such as paragraph breaks and page breaks.
- Once these marks are visible, look for a paragraph mark (¶) or any page breaks on the blank page.
- Tap just before the paragraph mark or page break, then press Backspace to delete it.
Performing these steps removes the hidden formatting that causes the blank page, effectively deleting it from your document.
The Pilcrow Sign and Its Importance
The Pilcrow symbol (¶) represents paragraph breaks in your document. It is a critical formatting mark in Microsoft Word that shows where paragraphs end, even if they appear as blank spaces on the page.
Turning it on helps you:
- See hidden formatting marks
- Avoid deleting important content accidentally
- Remove blank pages efficiently
- Maintain consistent headers and footers
Why Using ClickHelp Is More Convenient for Creating Documentation
When creating documentation, using a specialized platform like ClickHelp becomes essential. Traditional word processors often struggle with complex formatting and page management issues (as highlighted in this article), while ClickHelp provides a structured and efficient environment built specifically for technical documentation.
The ClickHelp interface makes managing and organizing content simple. You can easily handle formatting, structure, and layout without worrying about hidden characters such as the Pilcrow (¶) that often cause problems in Word. For example, if you need to delete an unnecessary topic, simply hover over the topic in the Table of Contents (TOC), click the More (⋮) button, or right-click the node, and select Delete from the context menu. This removes the topic cleanly without affecting the rest of your documentation hierarchy.
This streamlined workflow eliminates the frustrations of dealing with invisible formatting marks, page breaks, or unwanted blank sections.
Additionally, ClickHelp supports seamless team collaboration, enabling authors and editors to make updates, fix formatting, and publish changes instantly. The platform’s built-in publishing tools ensure that the final document is always consistent in structure and presentation across all output formats—something that can be difficult to maintain in manually edited Word files.
In short, for anyone producing detailed, step-by-step guides or user manuals (like this one on deleting pages in Word), ClickHelp offers a simpler, more reliable, and professional-grade solution for creating and maintaining documentation.
Conclusion
Deleting a page in Microsoft Word may seem simple, but it often requires understanding hidden formatting marks, page breaks, and section breaks that can make the process challenging. By enabling special formatting marks such as the Pilcrow (¶) and carefully managing paragraph and hard page breaks, you can safely delete blank pages or any specific page without affecting the rest of the document.
For mobile users working on devices like iOS, enabling special characters is essential for identifying and removing unexpected blank pages. Additionally, using specialized documentation software like ClickHelp can simplify complex formatting issues and enhance collaborative editing, resulting in documents that are both efficient and professionally prepared.
Following these guidelines ensures a cleaner, well-formatted Word document that’s ready for any purpose.
Good luck with your technical writing!
Author, host and deliver documentation across platforms and devices