

Sometimes, when you try to insert a signature into a Word document, the image may appear distorted or enlarged. Even if you delete it and try inserting a new signature line or copy it from another file, the same issue can occur. Adjusting the box size often just increases the zoom, making the signature appear too large.
Such display glitches can happen when working with signatures in the Word editor. Still, signing and adding signatures to Word files remains a common and essential practice for contracts, agreements, and other formal documents. Including a verified signature helps maintain authenticity and professionalism.
This tutorial will guide you through different ways to add signatures in Microsoft Word — from inserting scanned images to creating secure digital and electronic signatures with tools like DocuSign.
Why Would You Need to Insert a Signature in Word?
Adding a signature to a Word document allows you to:
- Sign files electronically or insert an image of your handwritten signature when printing isn’t practical.
- Ensure authenticity and give a professional touch to contracts, letters, and other formal papers.
- Use eSigning tools to speed up approval processes without the need to scan or fax documents.
- Sign securely with digital certificates that verify the signer’s identity.
Many professionals and organizations rely on Microsoft Word for preparing and signing documents because it supports multiple signature methods — from simple image-based signs to advanced digital certificates.
How to Add Signature in Word
It is simple to add a handwritten or stored signature in Word with the following:
- Sign your name on a blank sheet of paper using a pen.
- Scan the paper or take a clear photo of your signature and save it to your computer.
- Open your Word document and place the cursor where you want the signature to appear.
- Go to Insert → Pictures → This Device, then select the saved image file.
- Click Insert to add the signature to your document.
- Resize or move the image by dragging the corners, or adjust its placement using Layout Options (for example, behind or in front of text).

This simple method lets you include your handwritten sign as an image, preparing your document for either electronic use or printing.
Using Your Signature in Microsoft Word
Once you’ve created your signature in an image or digital format, Microsoft Word lets you manage and reuse it efficiently:
- Save it as a Quick Part or AutoText entry to quickly insert the same signature in future documents (Insert → Quick Parts → Save Selection to Quick Part Gallery).
- Use cropping and formatting tools to clean up the image and remove any extra whitespace.
- Adjust transparency or add effects for a more polished, professional look.
- Store signature files securely, especially if they include digital certificates, to prevent unauthorized use.
- Protect sensitive documents by enabling password protection or encryption when necessary.
Following these practices helps your signatures appear consistent, neat, and professional across all Microsoft Word files.
How to Add a Signature Line in Word
If you want to insert a formal signature line for someone to sign electronically or by hand, follow these steps:
- Click the spot in your document where the signature line should appear.
- Go to Insert → Signature Line in the Text group.
- Select Microsoft Office Signature Line.
- In the dialog box, enter the signer’s name, title, email address, and any additional instructions.
- Click OK to add the signature line to your document.
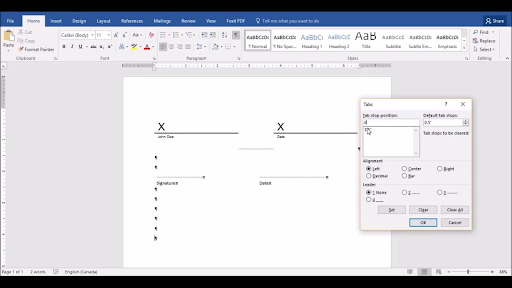
The inserted line includes a large “X” as a placeholder for the signer’s signature and can display their name and date if provided. This feature is especially useful for contracts, official letters, and government forms that require a professional signature area.
Adding an Electronic Signature in Word Documents
Microsoft Word allows you to add electronic signatures using digital certificates to ensure secure and verifiable document authentication.
Follow these steps to sign your document digitally:
- Place the cursor where you want your signature to appear.
- Go to Insert → Signature Line and insert a signature line (as described above).
- When ready to sign, click the signature line.
- Select your digital certificate issued by a trusted Certificate Authority (CA).
- If you use a hardware token (for example, a USB key), enter your PIN when prompted to complete the signing process.
Once signed, Word automatically locks the document to prevent unauthorized edits or changes that could compromise its authenticity.
For simpler electronic signing, you can also use tools like DocuSign, Adobe Sign, or Microsoft Office eSign add-ins. These integrations make it easy to send, receive, and verify signatures online without leaving Word.
How to Embed a Picture of Your Signature in Word
Instead of scanning a signature from paper, you can create one directly on your computer:
- Use the Draw tool or a drawing pad along with Word’s Drawing Canvas (Insert → Draw → Drawing Canvas).
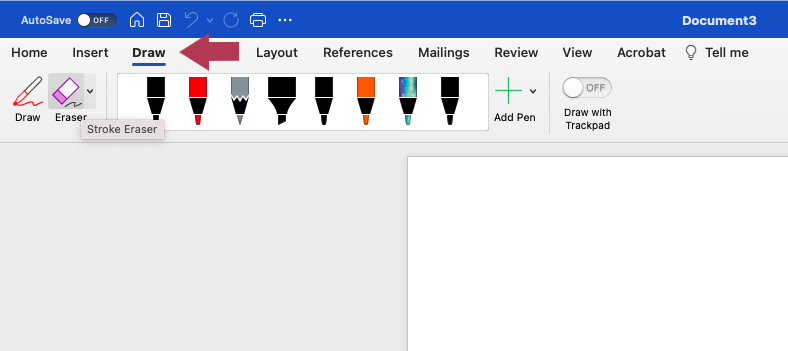
- Draw your signature using a mouse or touchpad.
- Save it as a reusable Quick Part for future use.
Alternatively, you can insert a previously scanned or saved image of your signature, as described earlier.
Converting Word to PDF and Signing: Methods and Advantages
After adding a signature or preparing a document for signing, converting your Word file to PDF is a common next step. PDFs preserve formatting and layout across devices and are widely accepted for professional and legal purposes. Here are several methods to convert and sign your documents:
Methods to Convert Word to PDF
- Save directly from Word: Go to File → Save As and select PDF as the file type. You can also set options like bookmarks or password protection before saving.
- Online conversion tools: Platforms such as Adobe Acrobat Online, iLovePDF, Smallpdf, and Canva allow instant PDF conversion from your browser without installing software.
- Google Drive: Upload your Word file to Google Drive, edit in Google Docs, and export as PDF — convenient for cloud workflows or users without Word installed.
- Third-party PDF converters: Applications like Adobe Acrobat Pro or PDF Pro provide advanced features, batch processing, and enhanced security, including digital signatures and encryption.
Benefits of Word to PDF Conversion Before Signing
- Preserves formatting: PDFs keep your signature, layout, fonts, and content intact, unlike editable Word documents.
- Professional appearance: PDFs are the standard for contracts, forms, and government documents, ideal for electronic or printed signatures.
- Wide compatibility: PDFs can be opened on nearly any device using free readers, enabling easy sharing.
- Enhanced security: PDFs can be encrypted, password-protected, and stamped after signing to maintain document integrity and authenticity.
- Integration with eSign tools: Most electronic signature platforms, including DocuSign and Adobe Sign, work natively with PDFs for secure signing and verification.
Signing the Converted PDF
You can add electronic or digital signatures using:
- Specialized PDF tools (Adobe Acrobat, DocuSign, Smallpdf).
- Free PDF software with signing features (e.g., Adobe Reader).
- Software that applies certificate-based digital signatures for legal and regulatory compliance.
Converting Word documents to PDF combines the flexibility of Word editing with the security and professionalism of PDFs, making it a best practice for most document signing workflows.
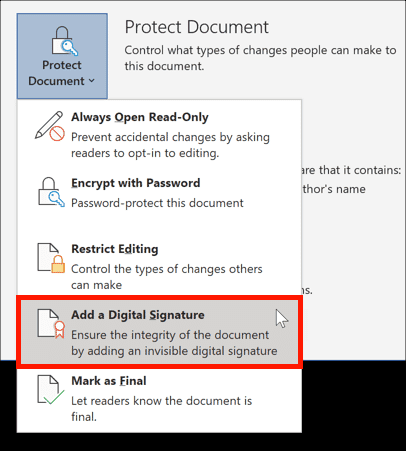
How to Add a Digital Signature in a Protected Word Form
Adding a digital signature to a protected Word form can be challenging, but it is possible without compromising the form’s usability. When a form is locked, Word may prevent signing on certain fields, so a careful approach is required.
Steps to Add Digital Signatures in a Protected Form:
- Insert Signature Lines First: Before locking your form, insert the required digital signature lines where signers will add their signatures (Insert → Signature Line).
- Protect the Form with Exceptions: Lock the form via Review → Restrict Editing → Allow only this type of editing → Filling in forms.
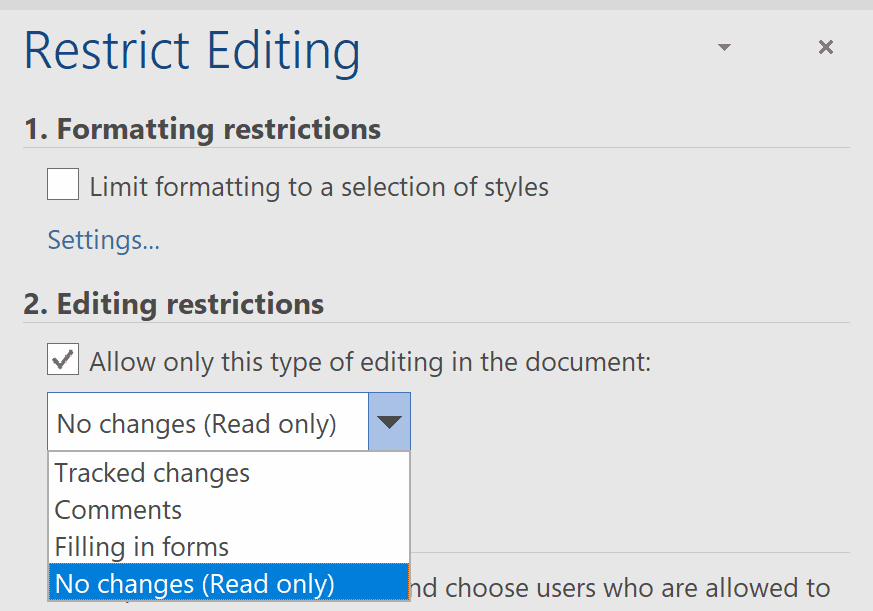
- Set Exceptions: Under Exceptions, select the users (or all individuals) who should be able to sign the signature lines. This allows authorized users to add digital signatures without unlocking the entire document.
- Use Content Controls for Signatures: If needed, enable Picture Content Control via the Developer tab (Developer → Controls → Picture Content Control). This allows users to paste a scanned signature even in protected mode.
- Sign After Protection: After protecting the form, users can double-click a signature line to sign using a valid digital certificate. Word will lock other parts of the form while still permitting signing.
- Version Compatibility: Word 2010 and later versions support this method. Mac or older versions may differ, so test the form across all platforms to ensure it functions correctly.
Benefits and Concerns
- Preserves document structure while allowing signatures without unauthorized changes.
- Ensures form integrity and verifies the signer’s identity through electronic signatures.
- Combines editing restrictions and signature lines for a secure workflow in forms with multiple inputs.
- For more advanced or automated signing, consider using DocuSign or exporting the form to PDF for certificate-based digital signing.
This approach maintains security, usability, and signature functionality, ensuring your Word forms remain professionally signed and fully protected.
Adding Visual Elements in ClickHelp
While Microsoft Word is great for creating and signing standalone documents, teams working on online documentation often need a more collaborative and secure environment. ClickHelp offers an integrated platform for creating, reviewing, and approving documentation with built-in role management, version control, and content protection.
In ClickHelp, instead of inserting a signature field as in Word, you can add various visual and identifying elements directly to your topics — such as scanned signature images, icons, or approval marks. This allows you to visually represent sign-off or authorship right within online documentation while maintaining strict content control and centralized document management in one secure, cloud-hosted platform.
Unlike Word, ClickHelp enables entire teams to collaborate on documentation efficiently. Using role-based access, topic locking, and version history, it ensures secure and traceable content approval. Each contributor or reviewer can comment, make controlled edits, and mark approval directly within the system — without the need to exchange multiple document versions.
Conclusion
Signature creation and management in Microsoft Word has never been easier, with tools ranging from inserting scanned signature images to adding secure digital and electronic signatures. Word offers flexible solutions to cover basic signing needs — such as signature lines or image insertion — and even supports integrated e-signing workflows through various services.
Whether you need to sign personal documents quickly or manage formal digital approvals, Microsoft Word provides reliable and convenient tools to create, verify, and share signed documents confidently and securely.
Good luck with your technical writing!
Author, host and deliver documentation across platforms and devices.
FAQ
How do I add a signature to a Word document?
To add a signature to a Word document, open your file, go to Insert → Pictures → This Device, and select an image of your handwritten signature. Then adjust the size or position as needed. You can also use Insert → Signature Line to create a formal signing field.
How to attach a signature in Word?
To attach your signature in Microsoft Word, click where you want it to appear, open the Insert tab, and choose Pictures or Signature Line. You can insert a scanned image, a drawn digital sign, or even use DocuSign or other eSignature add-ins.
How do you insert a signature in Word?
In Word, you can insert a signature using Insert → Signature Line or by pasting a signature image. This feature lets you place your personal or professional signature anywhere in the document for electronic or printed use.
How to put a signature on a Word doc?
To put a signature on a Word doc, either upload a scanned picture of your handwritten signature or create a digital one using Word’s built-in tools. You can then save your signed document as a PDF to preserve layout and authenticity.
How to add a signature to a document in Word on Mac?
On a Mac, open your Word document, click Insert → Pictures → Picture from File, and select your signature image. You can also use Word’s Draw feature to sign directly with a touchpad or stylus.
How to create a signature in Word with a digital certificate?
You can create a digital signature in Word by going to Insert → Signature Line → Microsoft Office Signature Line, filling in signer details, and signing with a digital certificate. This ensures authenticity and security for official or legal documents.