

A Table of Contents (TOC) in Microsoft Word helps readers navigate long documents by listing headings with page numbers. Below you’ll learn how to insert, create subsections, customize, and update a TOC in Word—and how the ClickHelp TOC solves multi-author and web-publishing needs.
Why You Need a Table of Contents in Word
A table of contents is helpful because it:
• Structures your document with clear headings and sections for easier reading.
• Lets readers jump to important topics instantly.
• Keeps long reports, manuals, or training materials organized.
• Automatically reflects changes when you edit headings or pagination.
How a Table of Contents Works in Word
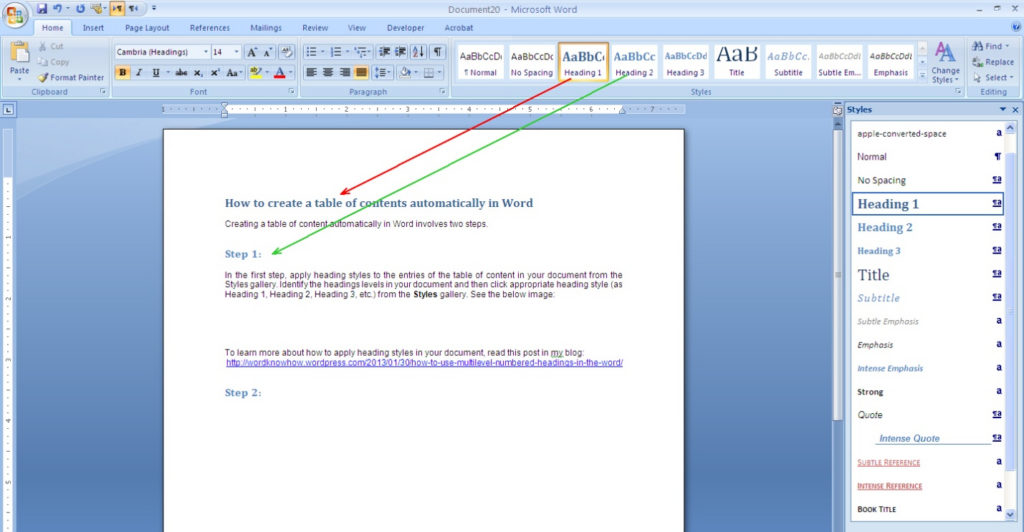
Word builds the TOC from built-in Heading styles (Heading 1, Heading 2, Heading 3). Apply these styles to the paragraphs you want included. Word then creates a formatted list with numbers and links that update as needed.
Tip: Manual formatting (bold, font size) doesn’t count. Use the Styles gallery (Home tab → Styles).
How to Insert a Table of Contents in Word
Working with large Word documents can be disorienting, so adding a table of contents makes navigation much easier and gives your document a polished, professional look. Here’s how to add one in both the desktop and web versions of Microsoft Word.
For the desktop version of Word:
1. Open the Word document where you want to insert the table of contents.
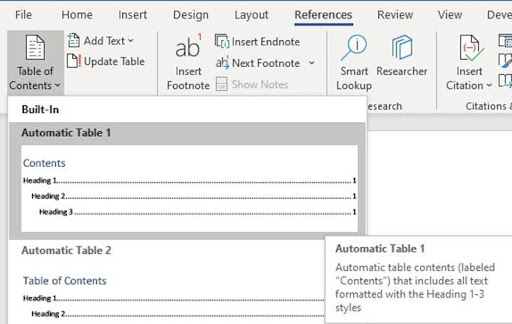
2. Go to the References tab on the top ribbon.
3. Select Table of Contents.
4. Choose an automatic style, such as Automatic Table 1 or Automatic Table 2.
Word will then generate a table listing all the headings in your document that use Word’s built-in heading styles. The table includes page numbers and automatically updates as you make changes to your document.
For Word Online:
1. Open your Word document.
2. Click the References tab on the ribbon.
3. Click Table of Contents.
4. Click Insert Table of Contents.
This also creates a navigable list of your document’s headings.
Using these features saves time and allows readers to move easily between sections without manually editing entries. Be sure that your headings are formatted with Word’s heading styles so the table populates correctly.
A table of contents is especially useful for organizing long documents such as reports, manuals, or training guides. With just a few clicks, you can create a dynamic, automatically updating table that keeps your work professional and easy to navigate.
Creating Subsections in Your Table of Contents
To include subheadings (or nested headings) in your table of contents, you need to format them with lower-level heading styles such as Heading 2, Heading 3, and so on. Microsoft Word automatically recognizes these styles and indents them beneath the main headings (usually Heading 1), creating a clear visual hierarchy in your table of contents.
This structure helps readers understand your document’s layout at a glance — from broad sections down to detailed subsections — keeping everything neatly organized.
In practice, apply Heading 1 to main titles, Heading 2 to their subtopics, and Heading 3 for any further breakdowns. This cascading formatting not only improves navigation but also gives your document a more professional appearance. Word will automatically adjust the indentation and hierarchy whenever you modify or add headings, so you don’t have to update the table of contents manually.
Consistently applying heading styles and dividing content into subsections is essential for producing a clear, accessible table of contents in Word.
Adjusting Your Table of Contents
Microsoft Word lets you easily adjust and customize your table of contents (TOC) at any time, giving you full control over how your document’s structure appears and functions.
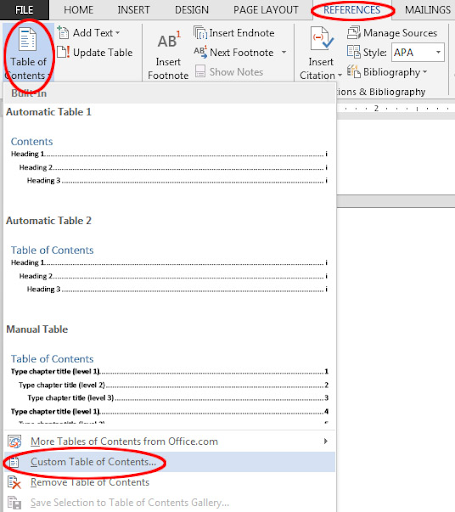
To adjust a pre-existing TOC:
Go to the References tab, click Table of Contents, and then select Custom Table of Contents.
- In the dialog box, you can:
- Show or hide page numbers.
- Align page numbers to the left, right, or center.
- Choose a tab leader (the dotted, dashed, or solid line connecting headings to page numbers).
- Decide how many heading levels to display — for example, only Heading 1, or Heading 1–3 for more detail.
- Click Modify to change the font, size, color, and formatting of TOC entries so they match your document’s design.
- When you’re done, click OK to save your custom TOC style.
Word uses built-in heading styles (Heading 1, Heading 2, and so on) to determine what appears in the TOC. If you’re comfortable with field codes, you can further refine which heading levels or custom styles are included by editing the TOC field directly.
By taking advantage of these tools, you can ensure your table of contents perfectly reflects your document’s structure and visual style, making it both easy to navigate and professionally presented.
Updating Your Table of Contents When Necessary
Whenever you add, remove, or rename headings in your document, you should update the table of contents to reflect those changes.
To do this:
- Right-click anywhere in the table of contents.
- Select Update Field.
- Choose one of the following options:
- Update page numbers only – if you’ve only edited or moved content but haven’t changed any headings.
- Update entire table – if you’ve added, removed, or renamed headings.
Word will automatically refresh your table of contents to match the current structure of your document.
Using the Navigation Pane on a Side Table of Contents in Word
If you want a side-placed, clickable outline of your document, Microsoft Word’s Navigation Pane is the most effective tool to use. It acts as a live, interactive map of your document’s headings, letting you jump instantly to any section — perfect for working with long documents.
Here’s how to use it:
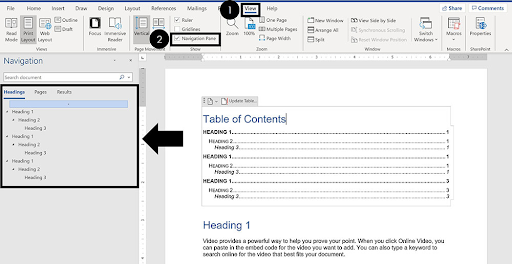
- Apply Heading Styles: Format your document’s titles and subheadings using Word’s built-in styles (Heading 1, Heading 2, etc.). The Navigation Pane relies on these styles to build its outline.
- Open the Navigation Pane: Go to the View tab on the ribbon and check Navigation Pane. You can also press Ctrl + F. The pane will appear on the left side of your screen, listing all your headings in order.
- Explore and Manage Headings: The Navigation Pane automatically shows all headings. You can expand or collapse levels to focus on specific sections. To reorganize your document, drag a heading up or down — Word will move the corresponding section automatically.
- Quick Navigation: Click any heading in the pane to jump directly to that part of the document. This saves time when editing or reviewing long files.
- Keep It Visible: You can leave the Navigation Pane open while you work, using it as a constant side menu to move between sections effortlessly.
- Optional: Add a Table of Contents: For readers, you can still insert a traditional table of contents by going to References → Table of Contents. This creates an interactive list within the document itself, linked to the same heading styles used by the Navigation Pane.
Using the Navigation Pane alongside a traditional table of contents gives you both a dynamic, side-based navigation system while editing and a polished, clickable TOC for readers. Remember, consistent use of heading styles is what makes both tools work perfectly together.
Managing a Table of Contents in a Collaborative Word Document
Creating and updating a Table of Contents (TOC) in a collaborative Word document requires careful coordination to maintain organization and professionalism. A common issue arises when multiple authors modify headings manually—by changing font size, bolding, or adding spacing—instead of using Word’s built-in heading styles (Heading 1, Heading 2, Heading 3). This can prevent Word from recognizing headings properly, causing the TOC to omit entries or appear jumbled.
To avoid this, all contributors should consistently apply the proper heading styles throughout the document. You can verify usage by opening the Styles window in Word and checking which paragraphs are assigned to each heading. If inconsistent styles have already been applied, they can be corrected retroactively; what matters most for the TOC is the underlying style, not the exact visual formatting.
Once heading styles are standardized, Word’s dynamic TOC automatically updates as sections are added, removed, or changed. Clear guidance and coordination among contributors ensure that the TOC accurately reflects the document’s structure, providing readers with an effective navigation tool and keeping the final assembly process smooth.
ClickHelp: Table of Contents Features
For teams managing large documentation projects, ClickHelp provides a highly dynamic and collaborative Table of Contents (TOC) system. Unlike Word, which relies on heading styles, ClickHelp’s TOC is a hierarchical tree that organizes content in a flexible and interactive way.
Key features include:
- Topic Nodes and Folders: Individual topics can point directly to content, while folders group related topics without containing content themselves. Parent nodes can serve both as containers and as content holders, creating a clear multi-level hierarchy.
- Drag-and-Drop Reordering: Contributors can easily reorganize content by dragging topics or folders within the TOC. Changes are immediately reflected across the project.
- Customizable Node Icons: Nodes can display icons to indicate their type or status (collapsed, expanded, or standalone), improving visual organization and readability.
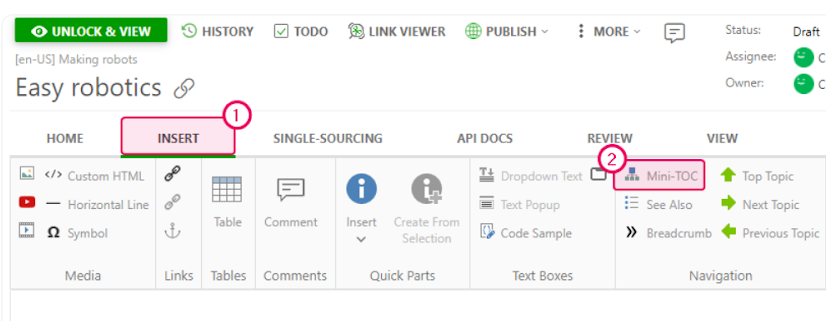
- Mini-TOC for Topics: Individual topics can include a mini-TOC, giving quick navigation links to subsections within the topic itself — particularly useful for long content.
- Custom Styling for Print: ClickHelp allows full customization of TOC appearance in printed outputs, ensuring that formatting and style meet project requirements.
- Searchable TOC: The TOC is fully searchable, enabling users to locate specific topics or sections quickly.
ClickHelp’s TOC system supports multi-author collaboration, with role-based permissions, real-time updates, and commenting features that let teams coordinate effectively. Contributors can work simultaneously without conflicting edits, and readers can rely on a consistent, structured, and easily navigable documentation experience.
This makes ClickHelp especially valuable for complex manuals, knowledge bases, or any documentation project where clear structure and collaborative efficiency are essential.
Conclusion
Creating a table of contents in Microsoft Word helps you organize your document effectively and allows readers to navigate information quickly. By consistently using heading styles, inserting an automatic TOC, customizing its appearance, and updating it as your document evolves, you can enhance both the professionalism and readability of your work.
For online documentation, tools like ClickHelp offer advanced features for managing a hierarchical, interactive TOC, supporting multi-author collaboration, quick navigation, and real-time updates. Whether you are working in Word or using specialized documentation software, a well-structured table of contents is essential for creating clear, accessible, and professional documents.
Good luck with your technical writing!
Author, host and deliver documentation across platforms and devices.
FAQ
How do I create a table of contents in Word?
Go to References → Table of Contents → Automatic Table. Make sure your headings use built-in Heading styles.
How do you create a table of contents in Word?
Same steps: select the TOC location → References → Table of Contents → choose an automatic style, then update as needed.
How to create a table of contents on Word?
In Word (desktop), use References; in Word Online, open References → Table of Contents → Insert Table of Contents.
How to get a table of contents in Word?
Apply Heading 1/2/3 to your document sections, then insert an Automatic Table from the References tab.
How to do a table of contents in Word?
Use styles for headings → References → Table of Contents → pick a built-in layout → Update when content changes.